Photo Tip: The only two tips you need to prevent blinking when using flash
You’ve been lying on the floor in an awkward position waiting to take a photo of your newborn baby doing that cute little look you love. After twenty minutes *click* you get it! But when you look at the back of your camera and their eyes are half closed. Noooooooo.
In the last article we went through all the tips that don’t work for preventing blinking when using flash. In our experience as Sydney Eastern Suburbs Children’s Photographers there are generally only two reasons people involuntarily blink when taking pictures. So here are the only two tips that you really need to save you that heartache in the future.

Turn off pre-flashes
OK I’m going to get a bit technical here so bear with me. When using TTL flash the camera flashes a few times (called pre-flash) in order to work out how much light is needed before taking the actual photo. It is over in a split second but some people react to this pre-flash and are halfway through a blink by the time the actual photo is being taken. In fact 90% of blinkies are caused by pre-flash so this tip will solve most of your problems.
Turning off pre-flash is quite easy to do. There are two options. Firstly, use manual flash. This is what we do in the studio, but it’s not feasible in other situations so we’ll quickly go to the second option.
The second option is to use flash lock. In Nikon it’s called FV (Flash Value) Lock and in Canon it’s called Flash exposure lock (FEL). Every DSLR should have this option but it will have different names.
You will need to dive into the settings to assign it to a button. I have this set up on all my cameras. What it does is split out the pre-flash we talked about before. So when we press the FV Lock button the camera fires off the pre-flashes and calculates the information it needs. Everyone can blink to their heart’s content. Then when you actually take press the shutter button it uses the calculations and fires a single flash to take the photograph.
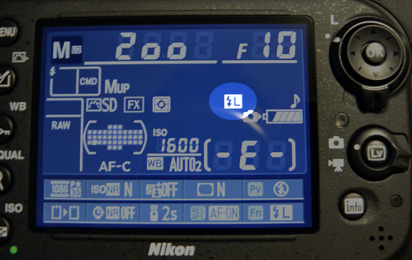
Once the flash is locked you will get an indicator in your LCD or viewfinder display. Again the symbol will vary from brand to brand. The flash lock will last until the exposure meter times out or until you press the FV Lock button again. This generally means you need to take a picture every few seconds or at least half press the shutter so the exposure meter stays on.
Exposure delay mode
Nobody has reflexes to blink faster than a single flash pulse. That’s a scientific fact. And yet you’ll find some people still blinking consistently after you’ve turned off pre-flashes. What gives?
When you take a picture with a DSLR, the following things happen. The mirror in front of the sensor slaps up (darkening the viewfinder). This makes the distinctive noise people associate with photo taking. The shutter in front of the sensor opens (this is practically silent). The flash pulse goes off. The shutter closes. The mirror comes down (and makes another slap).
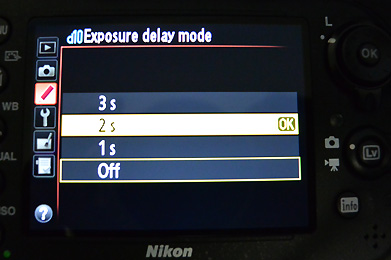
Some people react to the sound and blink! Chances are they’ll blink even when you don’t use flash. This is where the Exposure delay mode comes in. The Exposure delay mode puts a delay between the mirror slap and the shutter opening. In recent cameras the delay can be set from 1-3s. Not all brands have this feature though.
By using this mode when you press the shutter the mirror goes up, then there is a delay, then the picture is taken automatically. You don’t have to do anything other than to hold the camera very still during the whole time. By adjusting the delay the person would have finished blinking after the mirror slap and you will get a good picture. 2s is probably a safe setting.

Some brands, eg Canon, don’t come with this setting but you can use the Mirror lock-up setting instead which every DSLR should have. In Nikons it is a shooting mode marked by ‘Mup’. In Canons it is selected in the Custom Function menu. The difference between Mirror lock-up and Exposure delay mode is that with Mirror lock-up the first shutter press lifts the mirror, and the second shutter press takes the picture.
The disadvantage is of course that you have to remember to press the shutter twice instead of once, and that you have to be very careful that you don’t shake the camera with the second shutter press. Also between the first and second press the viewfinder will be blacked out. You will have to guess when everyone has finished blinking and press the second time.
Conclusion
Well that’s it, the only two techniques you need to avoid blinking people in your pictures. In fact, we reckon you can get away with just the first tip, and just by taking a couple of extra shots you’ll be 99% there. Easy! Now you can get back to taking photos of your little loved ones.
Valent Lau Photography provides Children and Family Photography in Sydney. Contact us now and take your first step towards creating some beautiful heirlooms.

Get 5 Pro Tips to Have the Best Newborn and Pregnancy Photos Ever
Creating gorgeous photographs of your pregnancy and new child is a must… Get this free booklet with tips on how to truly shine and get amazing photos, guaranteed.


